
First we have an idea. I found this picture of a vintage Halloween card and I don't know that I've ever seen cuter trick or treaters, aside from my own adorable children, of course!! I immediately envisioned them inside a pumpkin of sorts. So, first order of business - create a pumpkin for them.
.JPG)
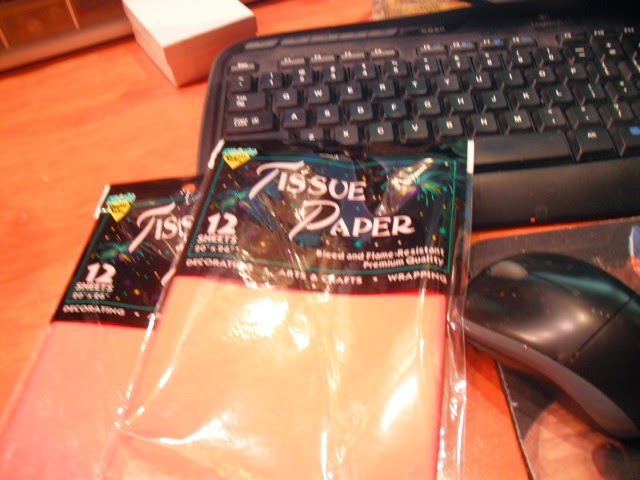
I had recently watched a Martha Stewart show excerpt that showed her making paper mache candy containers out of tissue, which negated the need to paint them. She made a huge pumpkin and a black cat, both out of tissue - I had also watched as Patrick Gill of Cre8tor's Touch (and the founding father of Every Witch Way Lane) used yellow tissue to create a translucent moon for a wall mounted piece he was creating - I thought this would be a good idea for the pumpkin shell. Off to buy tissue paper and make sure I had plenty of glue and balloons on hand. Check and check!


When making paper mache, I use good old flour and water with a generous helping of white glue added to give it a thicker consistancy and a stronger end product.

First few layers of tissue have been added to the balloon, which is seen here hanging around to dry out. My nickname for the art room when there are paper mache projects going on is "The Drunk Tank".


So, now I have a good shell to work with - I outlined where I wanted to cut the shell, both from the front and on the bottom - I plan on gluing the shell down onto a painted wooden base, which will house the trick or treaters. I opted for two of them - I didn't want to have to scale them down too small, so I opted for two.

I tend to not measure things when I am creating - I don't use rulers a whole lot either, but when it comes to spheres, if the circle cut- outs were off, it was going to throw the whole thing off and make it look really wonky - I used a compass to get a circle and then folded it four times and cut it to get it to the size I wanted. Now I have a template to draw the desired cut marks onto the shell. I didn't want to use the compass directly on it, it would have poked a hole in the shell, or at the very least, a gouge. No thanks.


.JPG)
And here is the shell with the cuts made. I really do like the way it came out. Just need to add some paper clay work to the outside to turn it into a real pumpkin. Right now, however, I am playing around with the armatures for the trick or treaters. Placement looks good so far.
.JPG)
.JPG)
.JPG)
.JPG)
So, while I was doing my shameful ten minute time out, my armatures felt sorry for me and brought me candy corn to eat while I was waiting for the timer to go off.. Halfway through, they asked me what I was really doing cause they couldn't really tell WHO had put me in time out and WHAT was stopping me from getting OUT of time out, at which point I had to admit to these clever little boogers that I was really just taking a quick coffee break, but thank you for the candy corn. They thought this was VERY funny, and laughed in that wonky way that armatures will laugh before they have proper mouths.
.JPG)
Once it was determined that the use of these pre made letters was not a capital offense and nobody was being sent off to Time Out for being near them or touching them, these guys pitched in and helped by handing them to me as I placed them. Best armatures ever!!!
.JPG)
So, as I mentioned , I am suspending the banners by filaments, and while I have glued them down to the back of the banner, I wanted to make them super secure by cutting black paper out to glue down over the filaments on the back of the banners.
.JPG)
.JPG)
And here is the banner from the front - its worth noting that while the letters came with self adhesive on the backs, I also added a spot of glue to them before pressing them down to be sure they stayed put. As you can see, I got the "float" affect I wanted, you can hardly see the filament!

While we are on the subject of security, the cardstock was so thick and heavy, that when I bent the tabs that the sign will hang from, I was afraid the cardstock would actually crack. I added duct tape "treads" to the back to secure those as well.

Now to figure out how to mount this thing along the back wall of this sphere. Easier said than done! This is not a flat wall here, folks! Probably the most annoying part of this project, hanging this banner.


In the meantime, Ive started the paper clay work on the armatures.

Ive also coated the inside of the pumpkin in orange glitter (WELCOME TO THE GLITTER DOME!)
AND Ive managed to hang the sign up along the back wall as well. It still looks like an oversized weirdly colored nut shell to me, though. We need to pumpkin this thing up!

Paper clay stem, leaves and a few little vine type thingies and I think we will have a pumpkin soon!


More paper clay work on the first figure - shes coming along ok as far as I can tell.


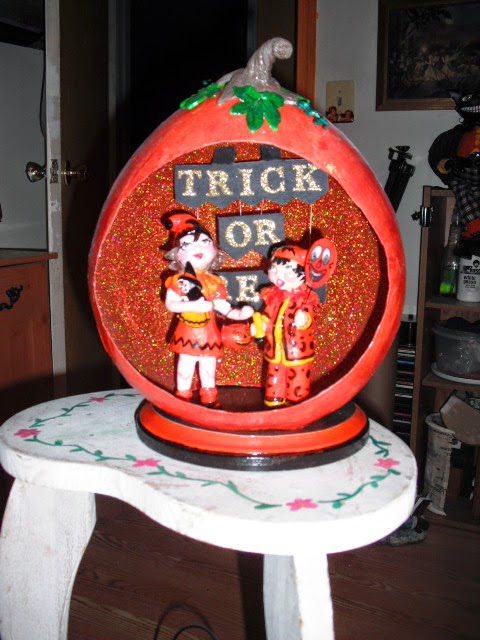
Placement inside the pumpkin - wait, did I say pumpkin? Yes, I did! I think we have a pumpkin here! The paper clay accessories look pretty good, no?


SOMEBODY PLEASE CALL THE MAID TO CLEAN THIS PIGSTY UP!! Oh wait - we don't have a maid? Really??? You mean...I have to do it....MYSELF???? Well, at least the paper towels are already at hand!!

Ok, all cleaned up and ready to move ahead - now I have to apologize, because once I started the painting and the clay on the second girl, I kinda don't know what happened. I mean, I do know, but I didn't stop to take any other pictures. I just went into that zone where there is nothing but you and the project and maybe some coffee and candy corn, but time has ceased to exist and you forget to eat (although that NEVER lasts long around here and I MORE than make up for it, believe me, but that's another story, another struggle and a different blog, trust me.) and you don't answer the door when family members are banging on it asking if you are planning on coming to bed sometime before sunrise, and you don't hear it when your little dog is scratching at the door and whining for you to come play the cookie bone game with him - nope - nothing. Just you, the paint, the clay and the project. So, please forgive the obvious lapse in pictures - it just happened. Sorry. Time out for Arlene! (or really just another coffee break, no doubt. LOL!)

Now, I have to share this. First let me say I love Triple Thick. I have always used it in the liquid form, brush it on, and it leaves a super glossy clear coat. I just love the stuff. Imagine my delight when I found spray on Triple Thick in AC Moore, just sitting there on the shelf as if it were not the most fabulous, incredible find EVER!!! I was so thrilled, it was silly. Of course I bought it.

Now, take a good look a the ruffle around the girls neck below. That, my dears, is tissue. Tissue that has been sprayed with Triple Thick! The same tissue I used on the pumpkin shell, Is that not just fabulous??? If I had tried to brush on the liquid Triple Thick, it would have basically melted the tissue and turned it into a nightmare mess. But spray on? Fantastic!! And look at what it did!! It made it look like a cross between fantasy film and the candy shell on candy apples, with the same hard, shell like texture! I am just over the moon with the way this came out. Fantastic!!! Did I mention that this is fantastic? I did?? Well let me say it again!! FANTASTIC!!!


One little girl done, one to go. And..there she is. The girl on the left is holding a pumpkin pail and a witch doll that is painted on card stock and sealed four or five times with triple thick. I toyed with the idea of making an actual doll (get it? Toy....doll .....never mind. Hehe.) but went with the cardboard instead to keep the vintage feel. The girl on the right is holding a pumpkin wand made from cardstock as well, painted and sealed with triple thick. My son was checking it out and declared that he thinks I have adopted that pumpkin face as my mascot as it is the same pumpkin face that I used in my Witches Hats, Broomsticks and Black Cats Wind Chime project (creation post available on the blog - just look for the project) - I was happy with how they came out.


And there you have it. The Trick or Treat project, finished. Once I was done with it, I had no choice but to give it to my baby grand daughter Tori for her first Halloween. Her birthday is coming up the day before Thanksgiving, so even though this is her first Halloween she is almost a year old already and is very much aware of the holiday - we have her Minnie Mouse dress.costume all ready for her and I just can't wait to spend the holiday with her. I could not fathom doing ANYTHING with this project besides giving it to my two girls - my daughter and her baby girl Tori. And it's funny - once my son in law got a look at it, he said the girls look just like my daughter (the bigger one) and Tori, the smaller one. I know I specifically made the girls eyes brown as my grand daughter has lovely brown eyes but my daughter has blue ones. Maybe its really my inner child with Tori? Dunno, but whatever it was that drove this project, I was super happy to be along for the ride.
Happy Halloween!


.JPG)
I SERIOUSLY <3 THIS ONE!! AND YES I agree w/ Robbie D. they DO look just like my muffinettes Elicia and Tori! You never cease to amaze me Yama, with the Talent you posses, you are Da Bomb! lol xoxoxo
ReplyDeleteAww, thank you Drew! Hug and kiss Dana and Kat for me!!! I have something special for Kat for Christmas, will be sending it soon!! <3 <3 <3
DeleteThis is so wonderful Arlene! I'm sure she will treasure it for years and years!
ReplyDeleteThank you, Cortney! <3
DeleteIt's amazing that you find time to create AND document everything! I wish my brain worked that way :) Looks awesome Arnie! Love it!!
ReplyDeleteHi Weezie!! OMG, thank you for stopping by!!! I just take a LOT of pictures while Im doing stuff, my camera is on the art bench right there so I just take lots of pics and then when I have a hour or so (usually at 1 AM, hehe) I put it into my blog. This is on Elicia's mantle now - the minute it started to take shape I knew it belonged to her and Tori. <3
DeleteI came to hop! But had to stop! WOW! WOW! WOW!
ReplyDeleteThat is a treasure! Truly inspired! Thank YOU!
Thank you for stopping by Meme! Such kind words, truly!! Thank you for those, they mean a lot.
DeleteHow unique and a great tutorial
ReplyDeleteI really enjoy documenting the journey to a finished piece - I generally don't keep my projects. Either sold or given away - but the records of the creation? Those I keep. Thanks for sharing it with me.
DeleteDrunk tank, helping armatures, perhaps sniffing glue? Maybe you need some better ventilation?
ReplyDeleteI LOVED this post - words, photos and ideas all.
You have created memories as well as art.
You mean, like...open a window??? Can't do that! Cause you know...vampires and gnomes and stuff. ;) And who sniffs glue!!??? That's just gross. I prefer to eat paste, thank you!!!
Delete;)
new follower
ReplyDeleteA new follower and new to blogging so trying to figure out each sit was scary for a tech-challenged grandma, but a lot of great art was the fun part. Please enter me in the drawing.
ReplyDelete